What Bubble Advanced does
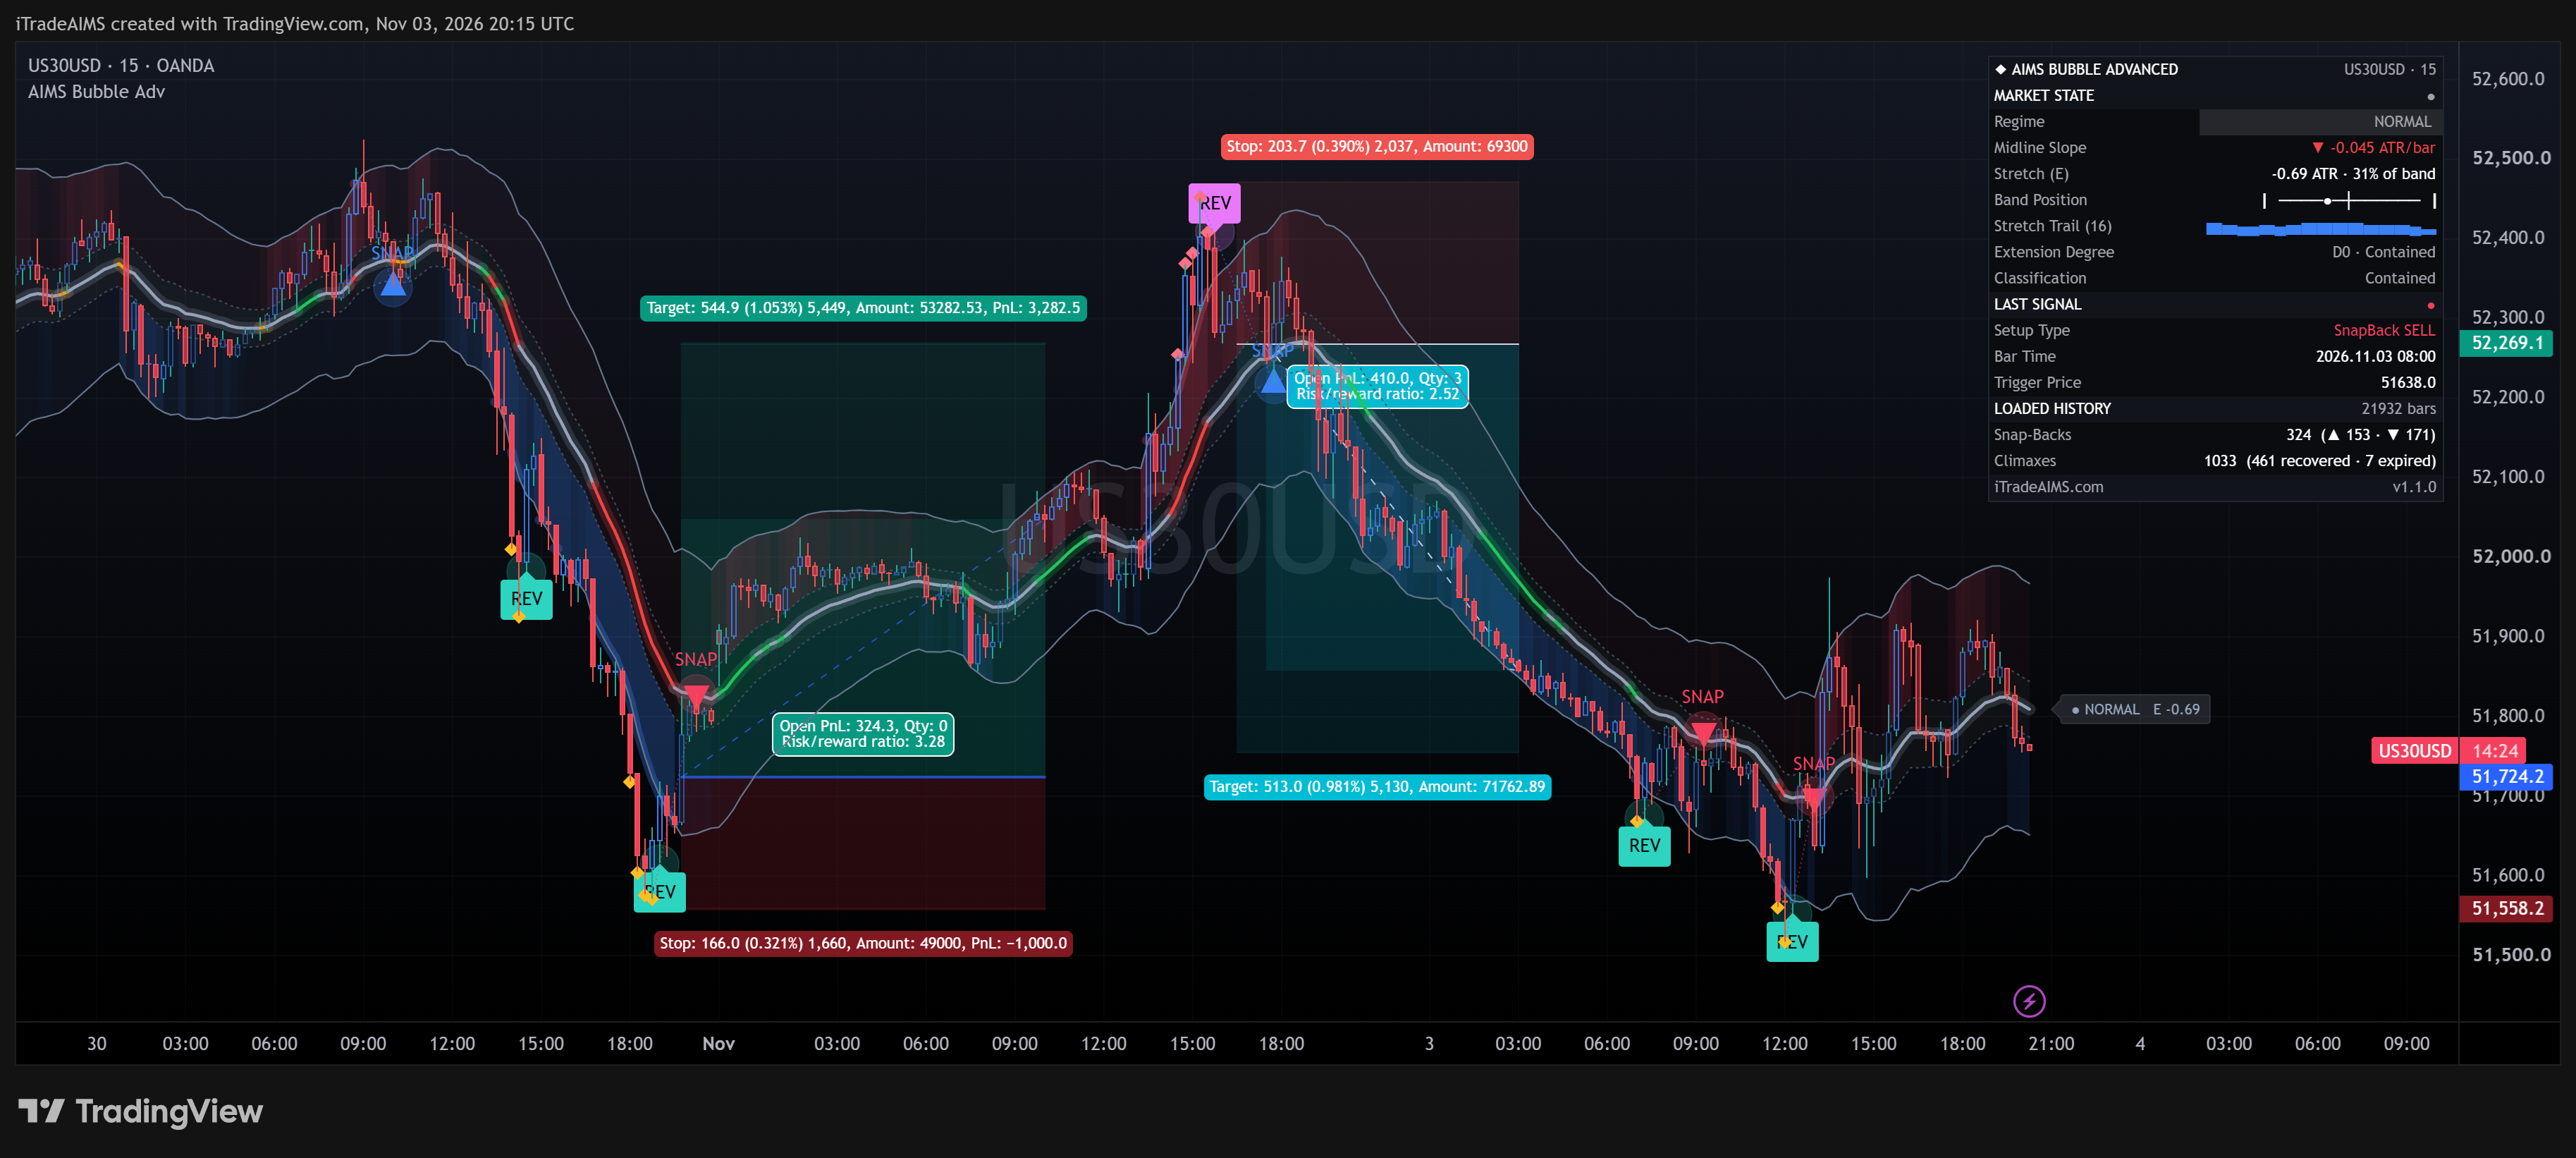
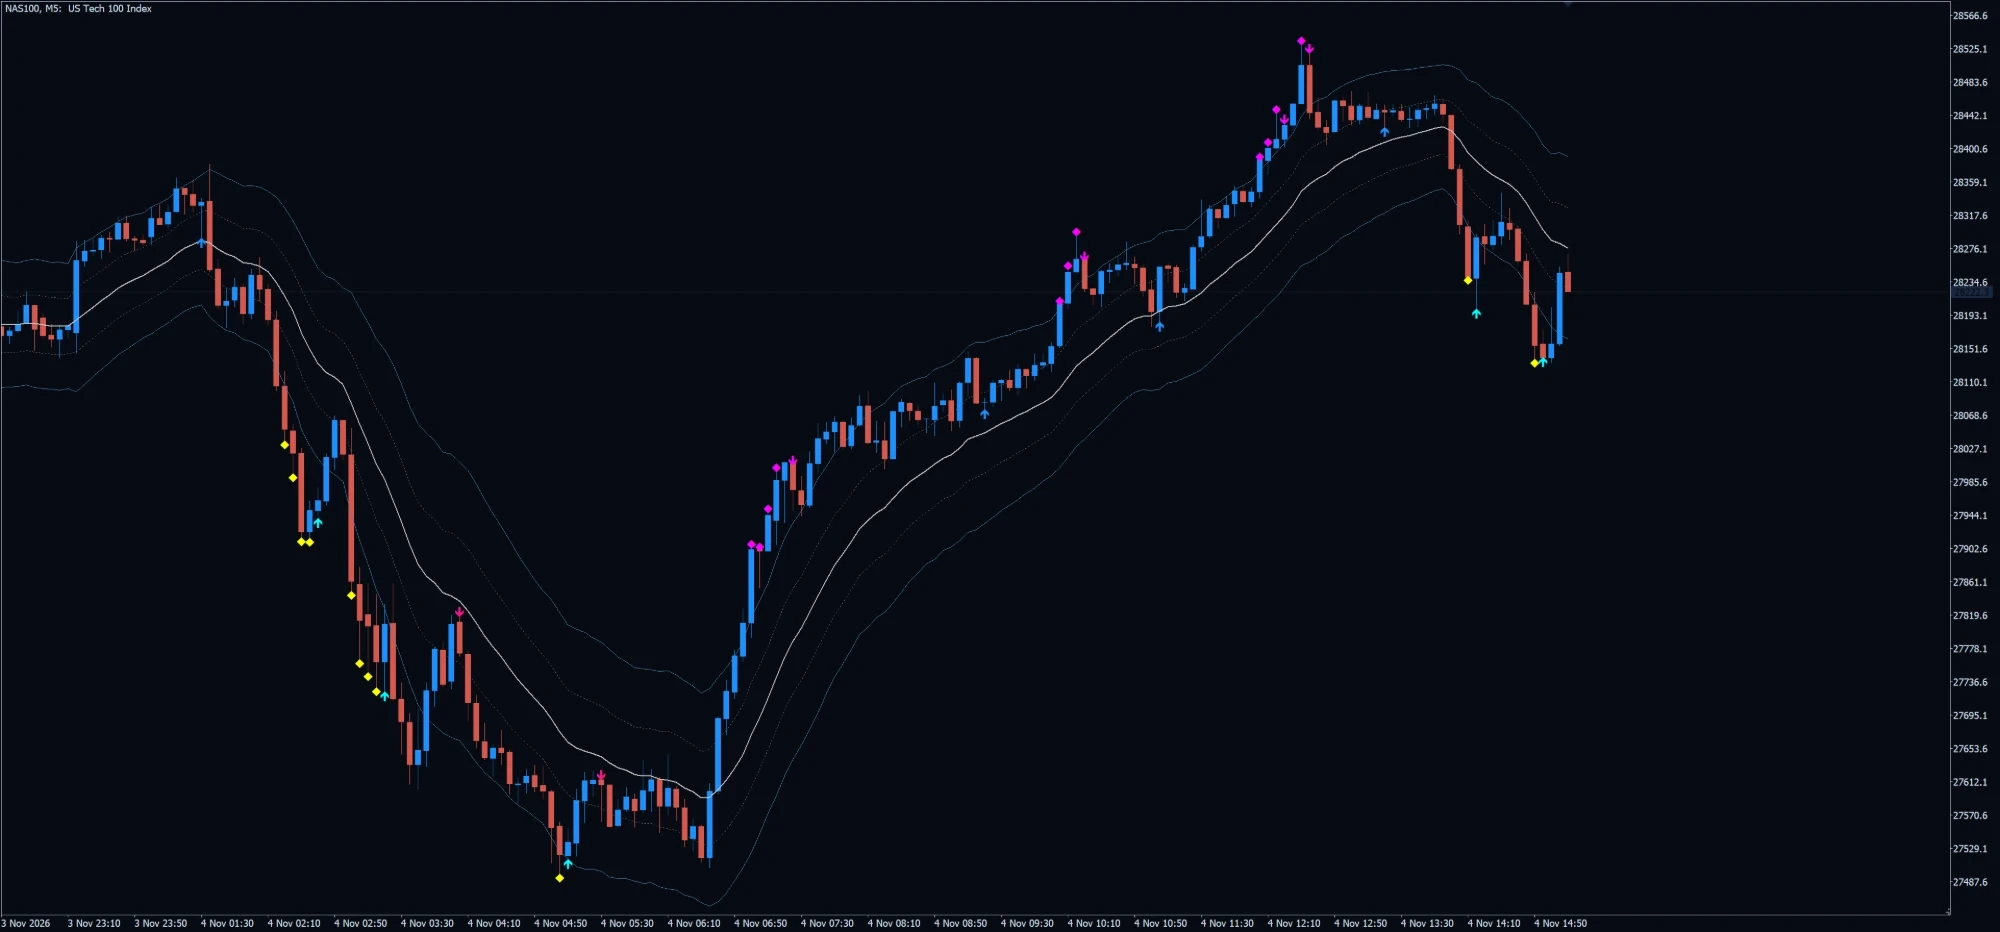
A Keltner channel built on a 20 EMA and ATR defines a normal range. Bubble Advanced then grades every extension beyond the outer band, classifies it as a continuation or an exhaustion peak, colours the midline by market regime and marks two kinds of setup.
Stretch Channel & Regime
EMA midline with a centre band (1.0 ATR) and a containment band (2.25 ATR). The midline is silver for Normal, green for Trending, gold for a Low-Vol Range and orange-red for Overextended.
Extension Degree & Classification
D1 for a single close beyond the band, D2 for consecutive closes, D3 for a velocity spike or bars entirely outside it. D2+ is classed BandRide or BlowOff.
Two Setup Engines
Snap-back continuations after a pullback with the slope aligned, and climax reversals: a diamond on the climax bar, then a recovery marker if a reversal bar follows within 3 bars.
How to trade Bubble Advanced
Read the Regime
Use the midline colour as context. Snap-backs in a Trending regime follow the trend; climax reversals are counter-trend and suit overextended moves classed BlowOff.
Treat the Diamond as a Warning
A diamond marks a climax bar. It is not an entry: wait for the recovery marker, which is the trigger.
Keep the BandRide Safeguard On
The safeguard blocks climax reversals while price rides the band in a runaway trend, so you avoid fading strong moves.
Tune Selectivity
Raise the minimum midline slope for fewer, stronger snap-backs, or choose the Midline EMA touch for deeper pullbacks. Signals confirm on bar close.
Prompts, not trade instructions. A SETUP READY prompt tells you to review the structure on a closed candle. It is never a command to enter blindly.
Setups and chart grammar
Bubble Advanced separates trend continuation from exhaustion before it marks a setup.
| Setup | Context | What the indicator sees | Goal |
|---|---|---|---|
| Snap-Back Continuation | After an extension beyond the containment band | Pullback to the centre band (or midline) with the midline slope still aligned and a confirming bar | Trend-direction entry; triangle marker |
| Climax (Tier 1) | Overextended, accelerating stretch | 4-Pillar: close beyond 2.25 ATR plus Bollinger (20, 2), Stochastic (5, 3) and RSI (14) extremes — or Band Poke: close beyond the band only | Warning only; diamond marker |
| Recovery Reversal (Tier 2) | Within 3 bars of a climax | A reversal bar after the climax, not blocked by the BandRide safeguard | Counter-trend trigger; recovery marker |
Green midline: snap-backs follow the trend.
Orange-red midline: extension at D2 or beyond.
Gold midline: compressed volatility.
Runaway trend riding the band: climax reversals blocked.
The Normalised Stretch Invariant
Stretch is measured in ATR from the midline, so the same thresholds work across symbols and timeframes. Signals are confirmed on bar close; the midline and bands update with the live price.
E = (Close - Midline) / ATR
Centre band = Midline +/- 1.0 * ATR | Containment = Midline +/- 2.25 * ATR
D1: one close beyond | D2: consecutive closes | D3: velocity spike or bars fully outside
Settings
| Input | Type | Default | What it does |
|---|---|---|---|
| Midline Period (EMA) | Integer | 20 | EMA period of the channel midline. |
| ATR Period | Integer | 20 | ATR period for band width and stretch. |
| Centre Band Multiplier | Float | 1.0 | Inner re-entry zone width, in ATR. |
| Containment Band Multiplier | Float | 2.25 | Outer band width, in ATR. Closes beyond it count as an extension. |
| Snap-Back Continuations | Boolean | true | Enable trend pullback entries. |
| Snap-Back Touch | String | Centre Band | Centre Band or Midline EMA. |
| Climax Reversals | Boolean | true | Enable climax diamonds and recovery markers. |
| Climax Model | String | 4-Pillar Confluence | 4-Pillar Confluence or Band Poke. |
| BandRide Safeguard | Boolean | true | Block climax reversals during runaway trends. |
| Derivative Lookback (Bars) | Integer | 3 | Bars used for stretch velocity and midline slope. |
| Minimum Midline Slope | Float | 0.02 | Slope, in ATR per bar, a snap-back needs in its direction. |
| Max Bars Awaiting Pullback | Integer | 20 | Bars a snap-back may wait for its pullback before the episode is dropped. |
| Input | Type | Default | What it does |
|---|---|---|---|
| InpSerialKey | string | "" | DLMS serial key licence activation. |
| InpMidlinePeriod | int | 20 | Midline period (EMA). |
| InpATRPeriod | int | 20 | Volatility ATR period. |
| InpCentreMult | double | 1.0 | Centre band multiplier (re-entry zone). |
| InpContainmentMult | double | 2.25 | Containment band multiplier. |
| InpEnableSnapBack | bool | true | Enable snap-back continuations. |
| InpSnapBackTouchMode | enum | Centre Band | Snap-back touch mode. |
| InpEnableExhaustion | bool | true | Enable climax exhaustion reversals. |
| InpExhaustionMode | enum | 4-Pillar | Exhaustion setup model. |
| InpBandRideFilter | bool | true | BandRide safeguard. |
| InpSlopeMinAbs | double | 0.02 | Minimum midline slope threshold. |
| InpMaxBars | int | 2000 | Max bars to render (0 = all bars). |
| InpShowPanel | bool | true | Show the draggable real-time dashboard panel. |
| Input | Type | Default | What it does |
|---|---|---|---|
| InpSerialKey | string | "" | DLMS serial key licence activation. |
| InpMidlinePeriod | int | 20 | Midline period (EMA). |
| InpATRPeriod | int | 20 | Volatility ATR period. |
| InpCentreMult | double | 1.0 | Centre band multiplier. |
| InpContainmentMult | double | 2.25 | Containment band multiplier. |
| InpEnableTier1Marker | bool | true | Tier 1 exhaustion (climax) markers. |
| InpEnableTier2Recovery | bool | true | Tier 2 recovery arrows. |
| InpEnableSnapBack | bool | true | Snap-back pullback signals. |
| InpSlopeMinAbs | double | 0.02 | Minimum midline slope threshold. |
| InpFilterGator / InpFilterAO / InpFilterPurple | bool | false | Optional Alligator, AO and Purple Magic confirmation filters. |
| InpMaxBars | int | 2000 | Max bars to render (0 = all bars). |
Use it in your EA
On MetaTrader you can read the levels and setup state from an Expert Advisor with iCustom().
// MQL5 — read Bubble Advanced setups on the last closed bar
int    h = iCustom(_Symbol, _Period, "AIMSBubbleAdvancedMT5");
double snapBuy[1], snapSell[1], recBuy[1], recSell[1];
CopyBuffer(h, 5, 1, 1, snapBuy);  // SnapBack Buy
CopyBuffer(h, 6, 1, 1, snapSell); // SnapBack Sell
CopyBuffer(h, 7, 1, 1, recBuy);   // Recovery BUY
CopyBuffer(h, 8, 1, 1, recSell); // Recovery SELL| Buffer | Name | Value |
|---|---|---|
| 0 | Bubble Midline | EMA midline price |
| 1–4 | Centre / Containment bands | Centre upper, centre lower, containment upper, containment lower |
| 5–6 | SnapBack Buy / Sell | Marker price when a snap-back prints |
| 7–8 | Recovery BUY / SELL | Marker price when a Tier 2 recovery prints |
| 9–10 | Tier 1 climax markers | Oversold / overbought climax diamonds |
Frequently asked questions
Bubble Advanced adds a regime-coloured midline, extension degrees (D1–D3), BandRide / BlowOff classification, the 4-Pillar climax model with a BandRide safeguard, and a market-state dashboard on top of the stretch channel.