Settings Overview
This page explains the main BananaEA Version 5 inputs using the friendly names users see in the MT4 Inputs tab. It is not a replacement for testing the loaded preset on demo or in Strategy Tester.
If a preset already matches your account, symbol, timeframe, and risk plan, do not change settings just because they are listed here. Use this page to understand what the visible inputs control.
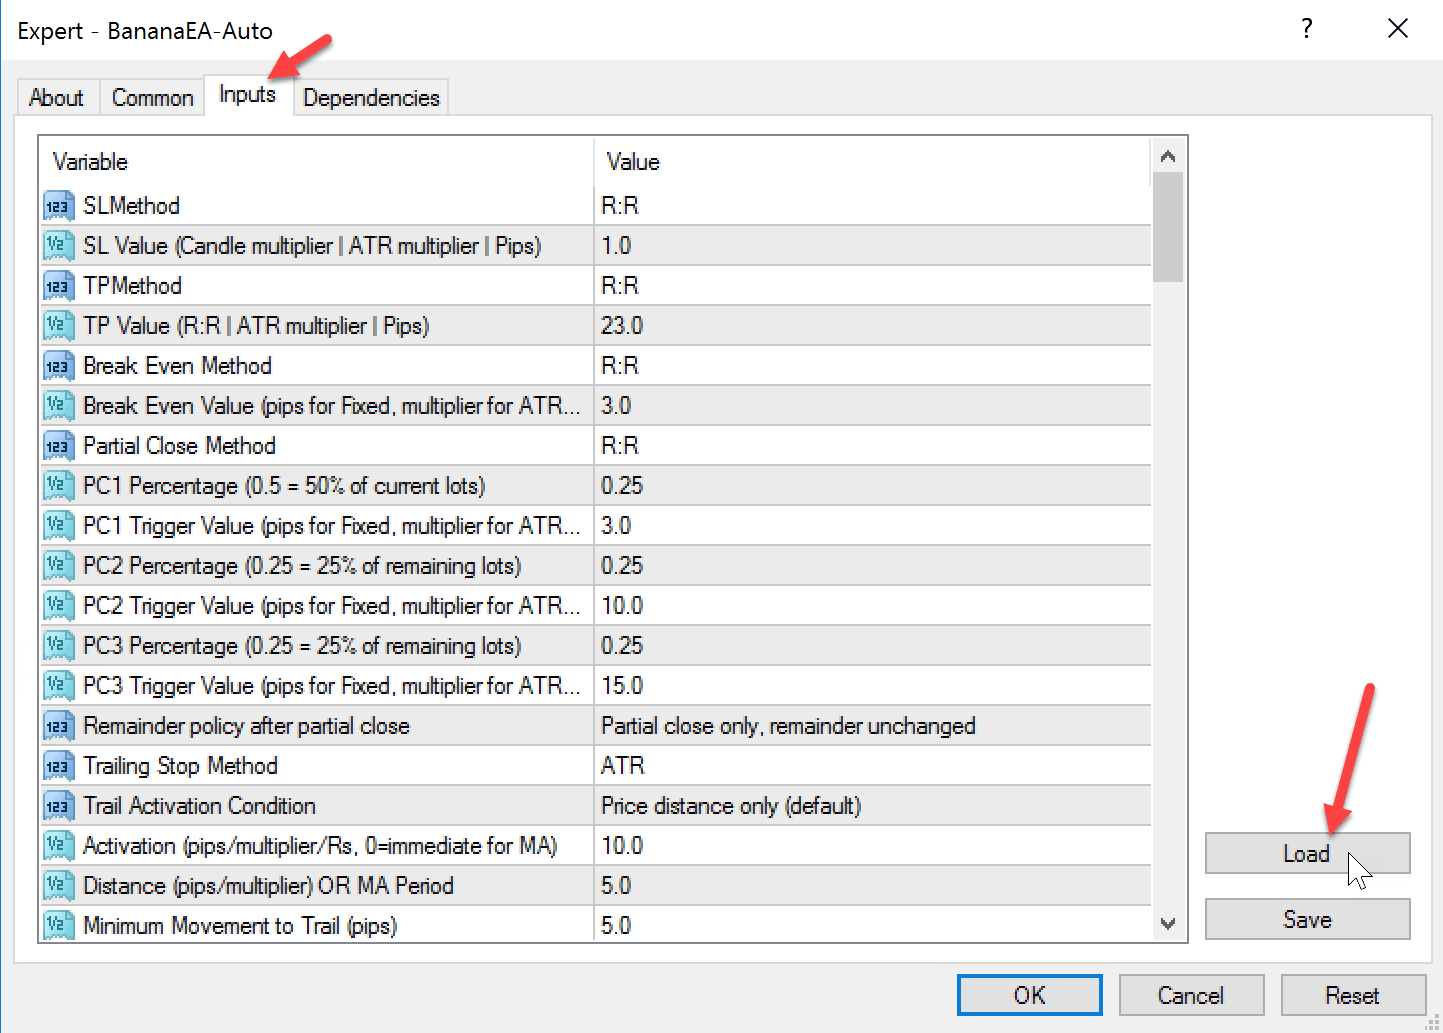
Open The Inputs Tab
- Attach
BananaEA-Autoto the chart. See Install And Upgrade. - In the Expert - BananaEA-Auto window, open the Inputs tab.
- Load a Version 5
.setfile before changing values manually. See Presets And Set Files. - Scroll the Variable list — Version 5 groups many inputs in one long list.
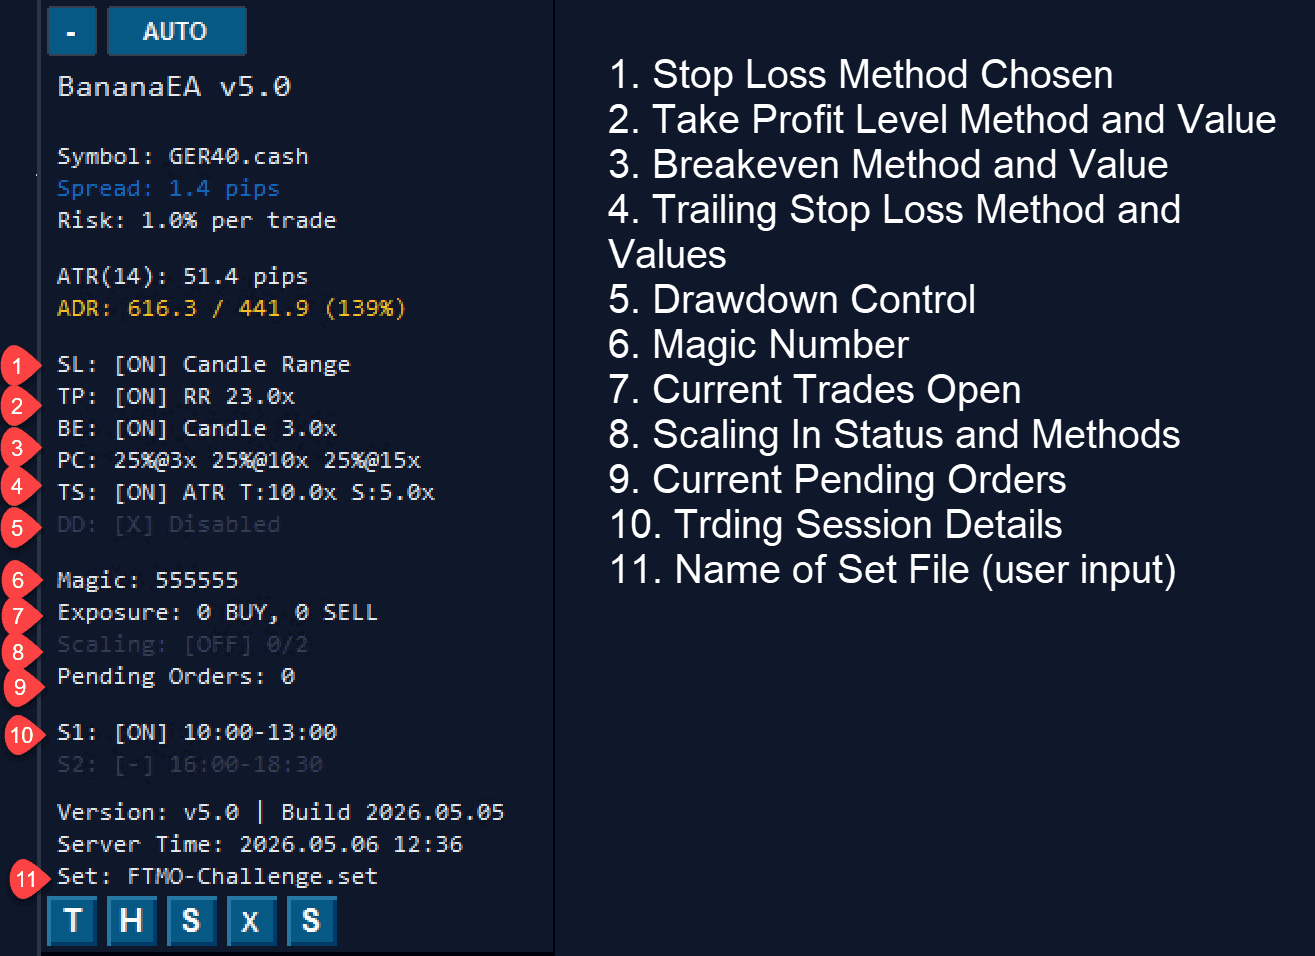
Confirm Loaded Settings On The Dashboard
After you click OK, use the on-chart dashboard to confirm what the preset applied. The dashboard summarizes stop-loss method, take profit, break even, partial close, trailing stop, drawdown mode, Magic Number, scaling, sessions, and set file name without reopening Inputs.
License And Chart Identity
| Input name | What it controls |
|---|---|
| License Key | Your BananaEA license key. Save a private .set file only if you want the key remembered for future loading. |
| Magic Number | The ID BananaEA uses to identify and manage its own trades on this chart. Use a different Magic Number for separate charts unless you intentionally planned otherwise. |
| Use Magic Number Filter | Limits trade management to matching BananaEA or Trade Manager trades. Keep this enabled unless you understand why another workflow needs it off. |
| Optimization Set Name (for Dashboard Display) | The set name shown on the dashboard so you can confirm which preset is loaded. |
Stop Loss, Take Profit, And Break Even
These settings control where the EA places the initial stop loss, take profit, and break-even behavior.
| Input name | What it controls |
|---|---|
| Stop Loss Method | How the stop loss is calculated, such as candle range, ATR, fixed pips, or another preset method. |
| SL Value (Candle multiplier | ATR multiplier | Pips) | The number used by the selected stop-loss method. |
| Take Profit Method | How the take profit is calculated, such as risk-reward, ATR, fixed pips, or another preset method. |
| TP Value (R:R | ATR multiplier | Pips) | The number used by the selected take-profit method. |
| Break Even Method | How the EA decides when to move the stop loss to break even. |
| Break Even Value (pips for Fixed, multiplier for ATR/Candle) | The trigger value for break even. What the number means depends on the selected break-even method. |
The screenshot in Open The Inputs Tab shows these rows at the top of the trade-management block.
A value can mean pips, an ATR multiplier, a candle multiplier, or a risk-reward value depending on the method selected above it.
Partial Close
Partial close lets BananaEA close part of a trade at planned levels while leaving the rest open.
| Input name | What it controls |
|---|---|
| Partial Close Method | How the EA calculates partial-close trigger levels. |
| PC1 Percentage (0.5 = 50% of current lots) | How much of the current trade closes at the first partial-close level. |
| PC1 Trigger Value (pips for Fixed, multiplier for ATR/Candle) | The trigger value for the first partial close. |
| PC2 Percentage (0.25 = 25% of remaining lots) | How much of the remaining trade closes at the second partial-close level. |
| PC2 Trigger Value (pips for Fixed, multiplier for ATR/Candle) | The trigger value for the second partial close. |
| PC3 Percentage (0.25 = 25% of remaining lots) | How much of the remaining trade closes at the third partial-close level. |
| PC3 Trigger Value (pips for Fixed, multiplier for ATR/Candle) | The trigger value for the third partial close. |
| Remainder policy after partial close | What happens to the position that remains after a partial close, such as leaving it unchanged or moving it to break even. |
Scroll the Inputs list to the Partial Close Method rows — they appear directly under the break-even settings in the same capture as stop loss and trailing.
Trailing Stop
Trailing settings control when and how the stop loss follows price after a trade moves in the planned direction.
| Input name | What it controls |
|---|---|
| Trailing Stop Method | The type of trailing stop BananaEA uses. |
| Trail Activation Condition | Whether trailing can start immediately or only after another event, such as break even or PC1. |
| Activation (pips/multiplier/Rs, 0=immediate for MA) | How far price must move before trailing can begin. |
| Distance (pips/multiplier) OR MA Period | The trailing distance, multiplier, or moving-average period depending on the selected trailing method. |
| Minimum Movement to Trail (pips) | The minimum extra price movement required before BananaEA adjusts the trailing stop again. |
| TC Button: Candle Buffer (pips) | Buffer used by the dashboard trailing/candle control. |
| ST: Swing Lookback Bars | How many bars the swing-trailing logic checks when finding a swing point. |
| ST: Swing Buffer (pips) | Extra buffer added around the swing point. |
See Trade Management And Scaling for more detail on partial close, trailing, scaling, and pending-order behavior.
Risk And Trade Count
These settings control position sizing and how many trades the EA may manage. They appear above the stop-loss block when you scroll to the top of the Inputs list.
| Input name | What it controls |
|---|---|
| Lot Method | Whether BananaEA sizes trades by percent risk, money risk, or fixed lots. |
| Risk Per Trade (%, $, or lots based on method) | The number used by the selected lot method. For example, 1.0 can mean 1% risk when Lot Method is set to percent risk. |
| Scale-In Mode | Whether BananaEA is allowed to add more same-direction trades after the first entry. |
| Maximum Open Trades | The maximum number of open trades BananaEA can have for this setup. |
| Max Signals Per Session | The maximum number of signals BananaEA can use during one trading session. |
| Strict Margin Rejection | Whether BananaEA should reject a trade instead of reducing lot size when margin is not enough. |
The dashboard Risk line and Scaling row show the active risk % and scale-in state after the preset loads.
Sessions And Trading Days
These settings control when the EA is allowed to open new trades. Find them in the upper portion of the Inputs tab, then confirm S1 and S2 on the dashboard.
| Input name | What it controls |
|---|---|
| Enable Trading Hours Control | Turns session time filtering on or off. |
| Enable Session 1 / Session 1 Start and End | First trading window. Check the start and end time carefully against broker/server time. |
| Enable Session 2 / Session 2 Start and End | Optional second trading window. Use it only when your strategy needs a second session. |
| Enable Day-of-Week Filter | Turns weekday filtering on or off. |
| Trade Monday, Trade Tuesday, Trade Wednesday, Trade Thursday, Trade Friday, Trade Sunday | Which days BananaEA may trade. |
Session times use the broker terminal's server time, not necessarily your local clock.
Market Filters
Filters can block trades even when a Banana or Seed signal appears on the chart. Scroll near the top of Inputs, below session controls.
| Input name | What it controls |
|---|---|
| Enable Fast EMA Filter / Fast EMA Period (Exponential Moving Average) | Fast EMA direction and trend checks used by the preset. |
| Enable Slow EMA Filter / Slow EMA Period (Exponential Moving Average) | Slow EMA direction and trend checks used by the preset. |
| Enable Slowest EMA Filter / Slowest EMA Period (Exponential Moving Average) | Slowest EMA direction and trend checks used by the preset. |
| Require Strict EMA Order (Fast < Slow < Slowest) | Requires the EMA stack to be ordered correctly before trades pass the filter. |
| Trend Filter Mode | The main trend-filter behavior. |
| Min Slow EMA Slope (ATR) | Blocks trades when EMA slope is not strong enough for the preset. |
| Min Price Distance From Slow EMA (ATR) | Blocks trades when price is too close to the slow EMA for the preset logic. |
| ADX Trend Strength Filter | Uses ADX to check whether trend strength is acceptable. |
| Use ATR-based SL filter / ATR period for filter | Uses volatility to decide whether market movement and stop size are acceptable. |
| Daily Range Filter | Blocks trades when the day's movement is already too large for the preset. |
| Session Movement Filter | Blocks trades when the current session has already moved too far. |
| 10 O'Clock / Open Price Filter | Uses a chosen open-price reference as part of the trade filter. |
Protection Controls
Protection settings can block new trades or close EA trades depending on the selected mode. Test these settings before live use. Challenge and drawdown rows sit at the bottom of the Inputs list, above Magic Number and License Key.
| Input name | What it controls |
|---|---|
| Enable Daily DD Control | Daily drawdown protection. |
| Max Daily Loss % | The daily drawdown limit. |
| Close All Trades on DD | Whether BananaEA should close EA trades when the drawdown rule is hit. |
| Trailing HWM DD Mode | High-water-mark style drawdown protection. |
| Trailing HWM DD Threshold % | The trailing drawdown limit. |
| Max Consecutive Losses (0=Off) | Stops new entries after a chosen number of losing trades. Use 0 if the preset disables this rule. |
| Session Profit Lock % | Stops new entries after the session reaches the chosen profit level. |
| Weekly DD Cap Mode | Weekly drawdown protection. |
| Weekly DD Cap % | The weekly drawdown limit. |
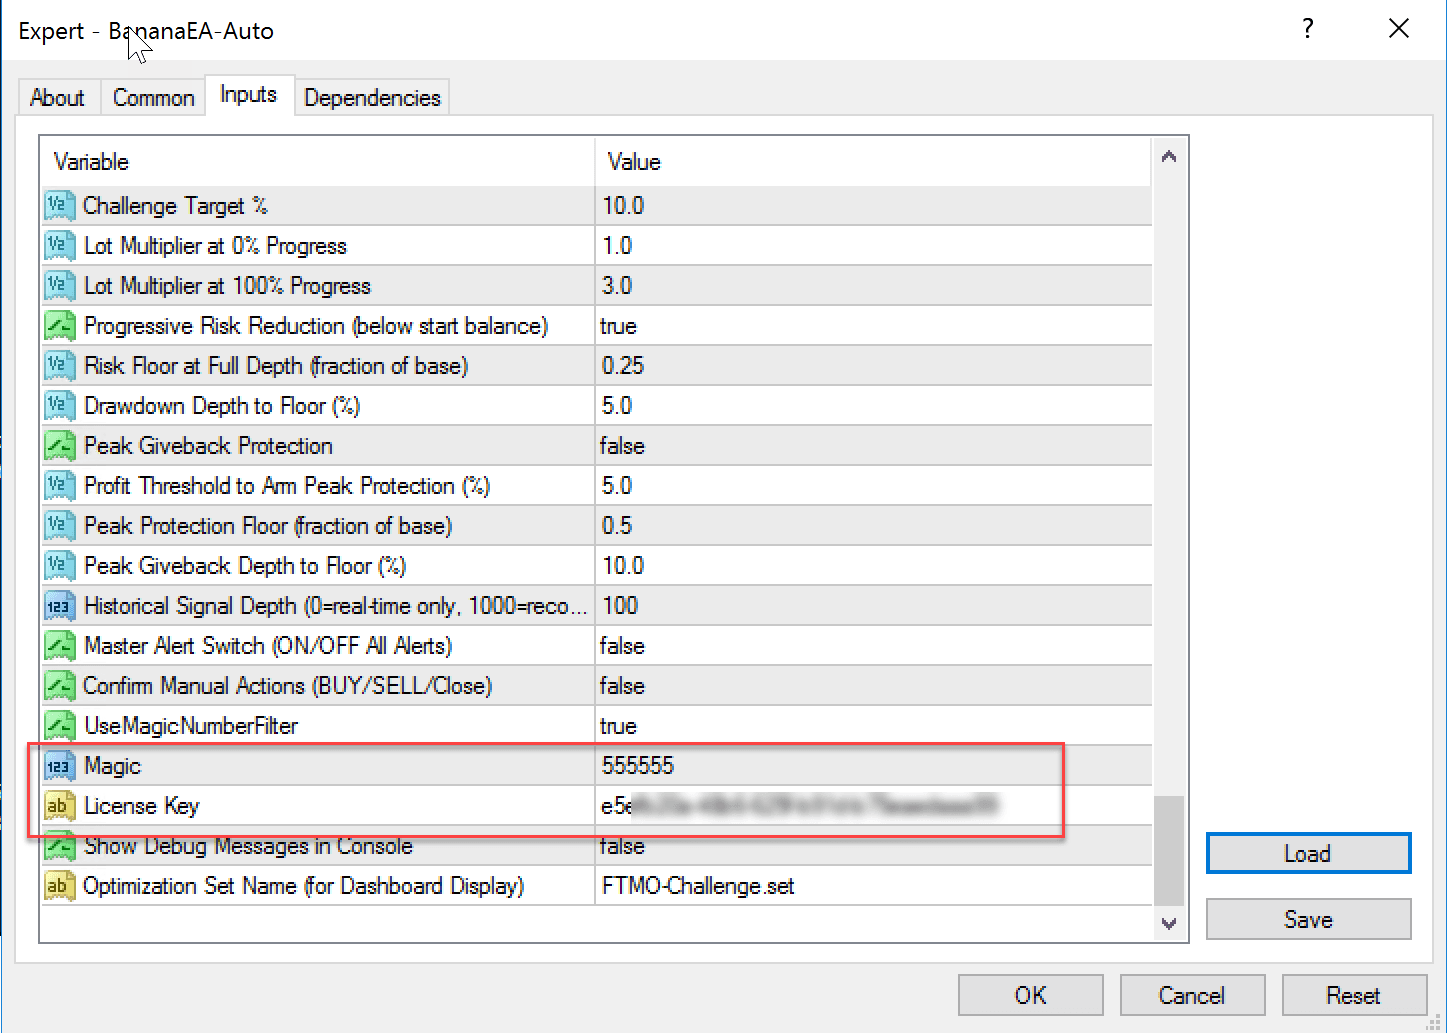
| Challenge Mode (Progress Compounder) | Challenge-style progress tracking and risk scaling. |
| Challenge Target % | The target percentage for challenge progress. |
| Lot Multiplier at 0% Progress | Lot multiplier used at the start of challenge progress. |
| Lot Multiplier at 100% Progress | Lot multiplier used when the challenge target is reached. |
| Progressive Risk Reduction (below start balance) | Reduces risk when equity drops below the starting anchor. |
| Risk Floor at Full Depth | Lowest risk multiplier allowed when the progressive reduction reaches full depth. |
| Drawdown Depth to Floor (%) | Drawdown depth where the risk floor is reached. |
| Peak Giveback Protection | Reduces risk if the account gives back profit after reaching a profit cushion. |
The lower-scroll capture above shows Challenge Target %, progressive risk fields, Use Magic Number Filter, Magic Number, and License Key in one view.
See Smart Risk Monitor for the customer-facing explanation of challenge and drawdown protections.
Beginner Checklist
Before live use, confirm:
- The loaded set name is the one you intended to use.
- License Key is entered or saved in your private preset.
- Magic Number is unique for this chart unless intentionally shared.
- Lot Method and Risk Per Trade match your account risk plan.
- Sessions and trading days match your broker/server time.
- Smart Risk and drawdown controls match your rules.
- AutoTrading is enabled only when you are ready.