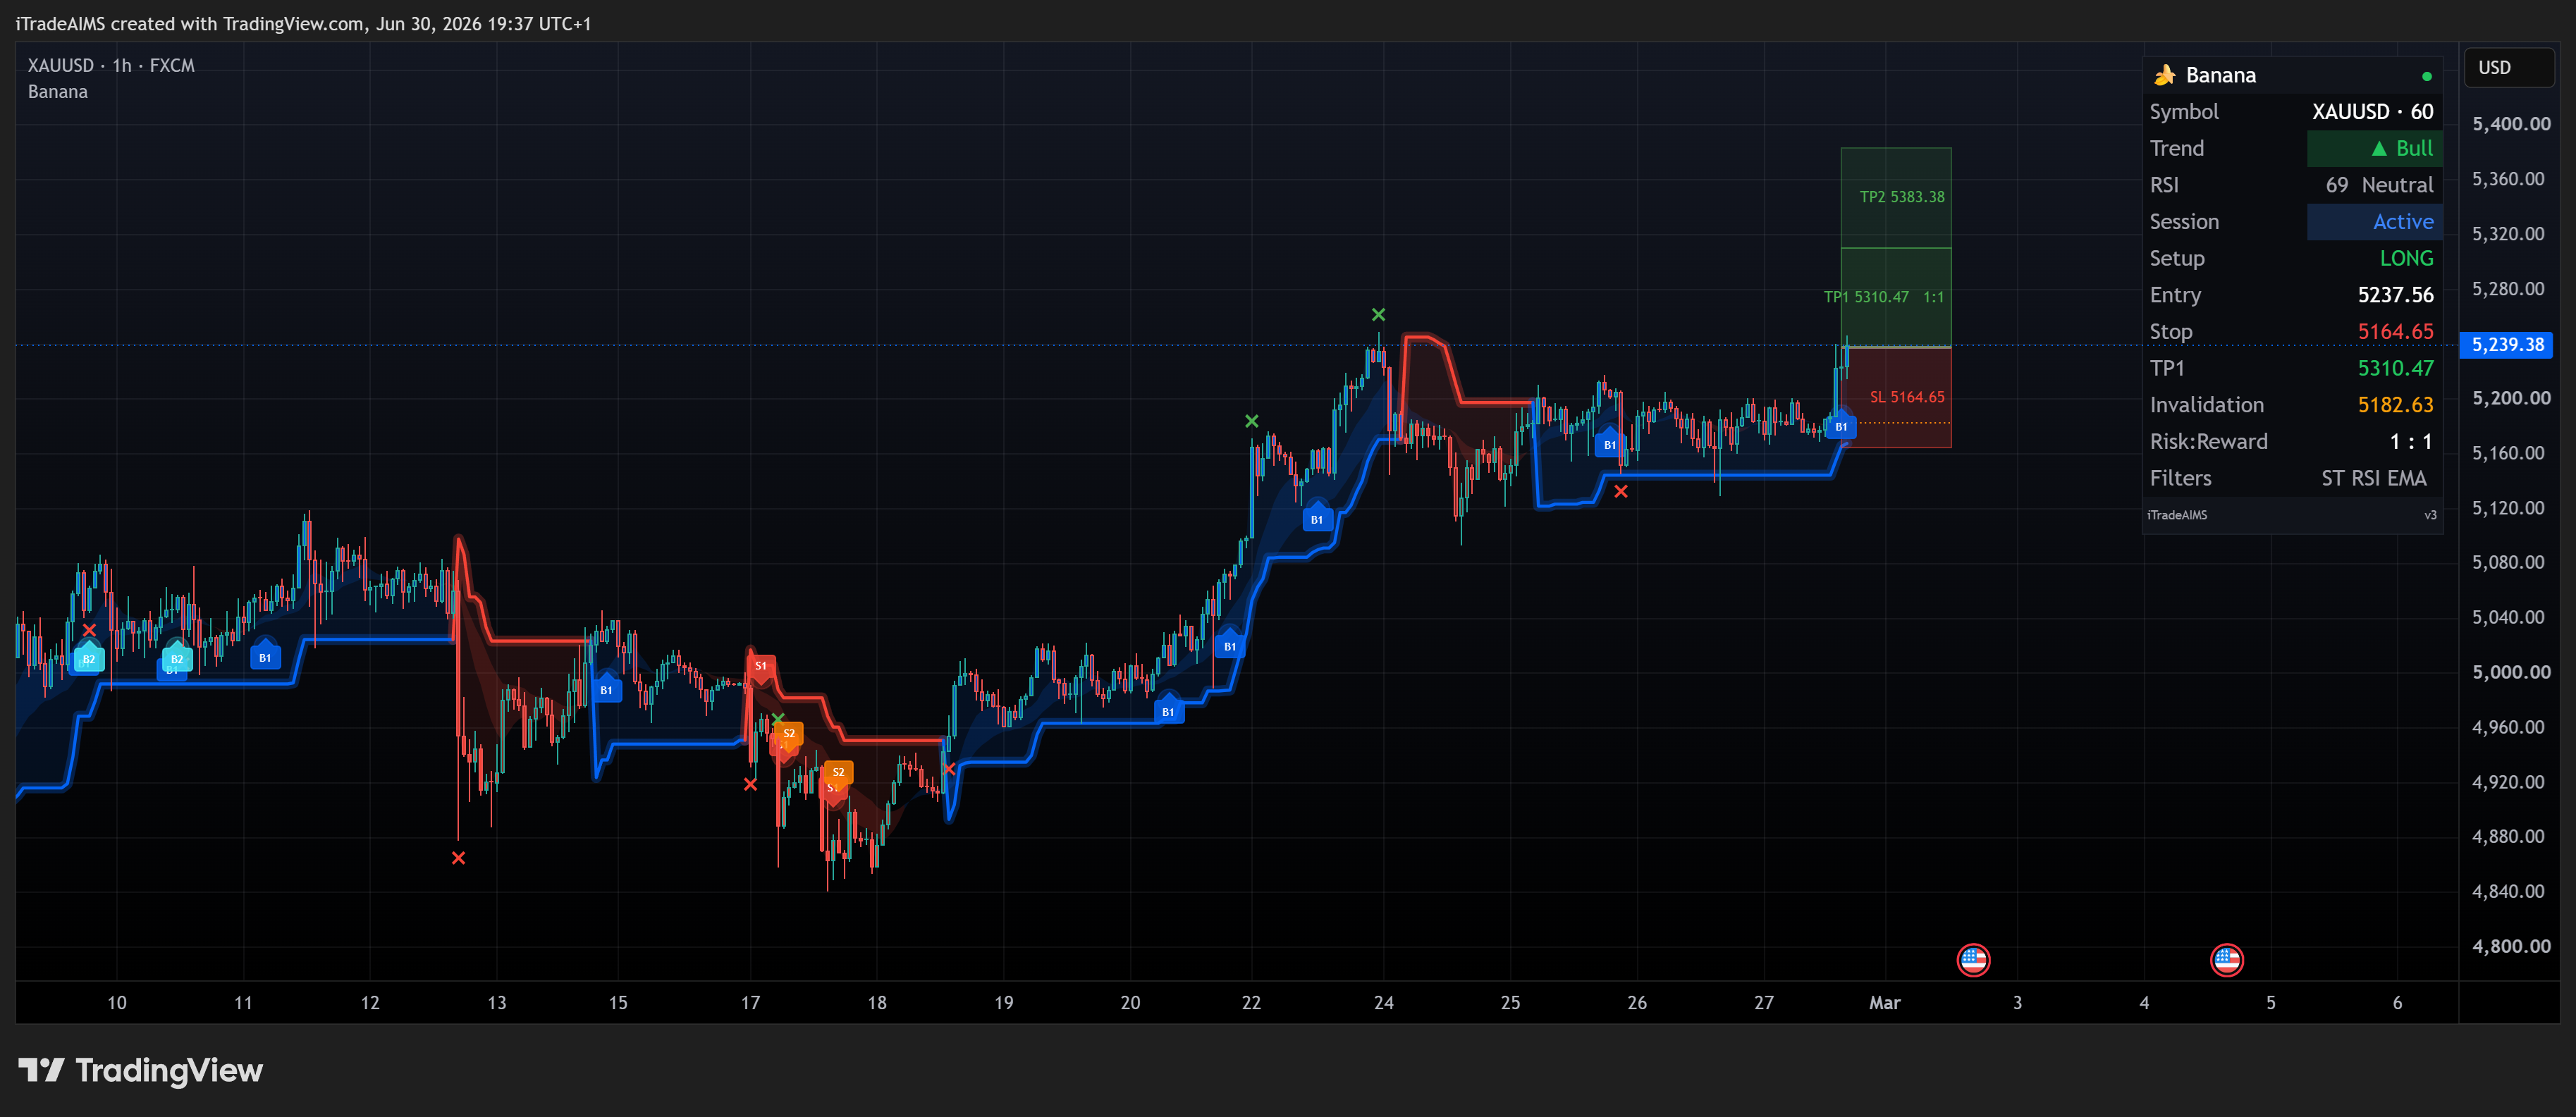
The Banana Indicator
Banana names two related things in iTradeAIMS:
- The Banana Strategy — a rule-based pullback continuation method taught in the membership course (impulse → controlled pullback → signal candle in the trend direction).
- The Banana Indicator — chart software (MT4, MT5, TradingView) that detects and marks those structures so you can review them faster.
The indicator automates the technical pattern checks. It does not remove your job: decide whether the market is trending, whether the setup fits your plan, and how you manage risk.
A marker is a prompt for review. It is not an automatic trade instruction and it does not replace your trading plan. Not financial advice.
Logged-in members can access the complete Banana Forex Trading Strategy Course inside the iTradeAIMS Members Portal. The course provides step-by-step video modules, pattern walkthroughs, signal validation flowcharts, and downloadable checklists to master the strategy alongside this technical manual.
What it is
The Banana Indicator is a visual chart tool that marks pullback-style signal conditions on your chart. It highlights possible Banana and Seed setups so you can review market structure, filter context, and risk before you decide what to do.
The trading problem it addresses is a narrow one: in a trend, pullbacks are constant and most of them are noise. Scanning several charts for the specific structure the Banana rules describe — a real impulse leg, then a controlled pause of the right depth — is slow, inconsistent, and easy to get wrong when you are tired. The indicator does that pattern check for you and puts a marker where the conditions were met, leaving the judgement calls to you.
What the indicator looks for
The Banana Indicator narrows generic pullbacks by combining structure and filters (varies by platform). Course and product docs describe roughly ten marker types on MetaTrader — seven pullback-based (numbered Banana 1–7: signal N ≈ N-candle pullback depth) plus three pause / inside-bar style signals. TradingView uses B# / S# labels instead of numbers, but the review habit is the same.
Common technical gates (when enabled):
- A prior impulse or directional push (often 2–3 trend candles breaking structure).
- A pullback that is not too deep or too violent — course sweet spot often 3–4 candles, with the 10 EMA (dashed) and 20 EMA (solid) still separated.
- Fibonacci-style min/max pullback depth and optional breakout-of-range filter (e.g. last 20 or 50 bars).
- No-trade zone between the 10 and 20 MAs; optional ATR stretch filter.
- Breakout, retest, or range-break context on some builds.
- Dashboard VALID / INVALID readout on MetaTrader suite builds.
Seed markers (dot-style) can appear earlier in the sequence — useful for observation, easier to clutter the chart. Banana markers are the main review set once you understand the flow.
Deep dive: Signal detection.

Where Banana fits in iTradeAIMS training
iTradeAIMS teaches trading as a staged path (T20 discipline training), not a bag of unrelated tactics:
| Stage | Focus | Relation to Banana |
|---|---|---|
| Stage 1 | Setup One only — box breakouts, fixed rules, discipline scored on rule adherence (not profit) | Foundation; everyone starts here |
| Stage 2 | Add Banana Strategy — learn the method, then trade a small subset of signal types | This indicator supports Stage 2 review |
| Stage 3 | Personal mastery — fuse Setup One + Banana + risk behaviour; trade only 2–4 Banana signal types that fit your temperament | “Trade fewer signals, more consistently” |
The Fruit Strategy (Stress-Free Trading books) is an advanced, separate campaign method — often counter-trend at reversals, with different risk and Purple-line rules. It is not what the Banana Indicator implements. Banana = pullback continuation in a trend.
Method lineage (brief)
Course and product history describe an evolving line of iTradeAIMS methods — from early Setup / Fruit Method work, through the Hunt Method (“wait patiently, strike decisively”), to the unified Banana Strategy (2019+) that the indicator and BananaEA encode. The indicator is the visual layer for the Banana rules; automation (BananaEA) is optional and still subject to the same review discipline.
How to trade it
The method in three beats
In course materials, the Banana Signal is also called Hunt 2.0 — the Stage 2 expansion after Setup One discipline training. Where Setup One focuses on box breakouts in the higher-timeframe trend, Banana focuses on entering an established trend on a pullback with a relatively tight stop.
A valid Banana-style setup is described as three beats:
Impulse (breakout or continuation leg)
→ Pullback (controlled pause — often a flag pattern)
→ Signal candle (Banana / Seed marker for your review)
The single most important filter in the course is “Where is the impulse move?” — without a real breakout or continuation leg, later pullback logic is weak. Course copy suggests that rule alone filters most low-quality signals.
Hard context rule: Banana is a continuation method. Do not treat Banana markers inside a trading range as actionable — pullbacks are for trends, not chop. See Banana strategy rules (range vs trend) and The 7 rules.
Read the market cycle first
Before any Banana marker deserves attention, decide trend vs range:
- Trend — directional structure, separated moving averages, pullbacks that respect the move → Banana may apply in the trend direction.
- Trading range — equal highs/lows, tangled averages, low conviction → wait for a breakout; skip continuation signals inside the box.
The market cycle model used alongside Banana: breakout → trend channel → trading range → (resumption or reversal). Most of the time price is in a channel or range, not a fresh breakout — which is why context filters (rules 5–7) matter. Details: Banana strategy rules — market context.
Seven validation rules
The course validates every setup with seven rules:
| Layer | Rules | Who decides |
|---|---|---|
| Pattern validation | 1–4 (impulse, pullback, climactic impulse, impulsive pullback) | Mostly automated by the indicator |
| Signal filtering | 5–7 (pullback count, S/R, higher-timeframe cycle) | You |


Full methodology: Banana strategy rules · rule charts: The 7 rules · printable checklist: Validate a signal.
Members: complete rules and flowcharts live in the membership portal.
Validate every marker before you act
Do not trade a marker because it printed. Run the validation habit:

Before taking action, check:
- Market direction and recent price movement.
- Nearby support or resistance.
- Whether the signal is on a completed candle.
- News, session, and spread context.
- Stop placement, position size, and account risk.
- Whether the setup matches your trading plan.
Full page: Validate a signal · Daily use checklist.

Tutorial notes: How to use The Banana Indicator.
How it reads on each platform
The same pullback logic is implemented separately for MetaTrader 4, MetaTrader 5, and TradingView. The UI, marker style, and dashboard differ — the review habit does not.

MetaTrader 4 — v44 panel and strategy rules
The MT4 build uses a compact dashboard on chart with filter switches, session/trend readouts, and an optional Strategy Rules checklist.


MetaTrader 5 — suite dashboard and VALID reads
On MT5, many traders use the iTradeAIMS Dashboard with Banana, Box, and Wave tabs. The Banana tab shows whether the latest candidate signal is VALID or INVALID and which filters passed.


More dashboard themes and controls: Dashboard panel.
TradingView — B# / S# labels and trade zones
The Banana Indicator TV (Pine v6, v3) is a separate build from MT4/MT5. It uses B# / S# labels, shaded trade zones, Smart Trail, and a Pine dashboard (trend, RSI, LONG/SHORT row).


Walkthrough gallery: Chart examples on TradingView.
Confluence with AIMS Box (optional)
On MT5, Banana signals can align with AIMS Box structure on the same chart — useful when you want signal + box context together.

Suite docs: Box tab in the Confluence set.
Settings reference
The three builds are separate products with their own inputs. Do not copy an MT4 label into MT5, or a MetaTrader label into TradingView — use the labels visible in your own Inputs tab.
On MetaTrader, open the inputs with: right-click chart → Indicators List → the indicator → Edit / Properties → Inputs tab. On TradingView, click the gear on Banana in the chart legend → Inputs.
Change one setting, write down what you changed, watch a few signals, then change the next. Return to defaults if the chart becomes confusing.
Shared — license and access
| Input | Platform | What it controls |
|---|---|---|
| SerialKey | MT4, MT5 | License validation. Enter the key exactly as issued, with no leading or trailing spaces. |
| (no key input) | TradingView | Access is granted by TradingView invite-only script permission, not by a SerialKey input. |
Full detail: Settings overview.
MetaTrader 4 inputs
Source: MT4 settings. Defaults are not published per input — read them from your own Inputs tab.
| Group | Input | What it controls |
|---|---|---|
| Signal Appearance | Banana Symbol Width | Size of Banana markers. |
| Signal Appearance | Seed Symbol Width | Size of Seed markers. |
| Signal Appearance | Distance from Candle High/Low | Moves markers away from the candle. |
| Signal Appearance | Show Number on Seed Signals | Whether Seed markers include numbers. |
| Signal Appearance | Display Signal Mid Bar | Places the marker around the candle midpoint instead of the candle extreme. |
| Signal Appearance | Signal Threshold (pips) | Pullback threshold used by the signal logic. |
| Signal Types | Show #1 Banana … Show #7 Banana | Which Banana signal types are visible. |
| Signal Types | Show #1 Seed … Show #3 Seed | Which Seed signal types are visible. |
| Signal Types | Show/Hide all signal arrows | Master visibility control for signal markers. |
| Arrow Styles | Buy / Sell arrow codes (Wingdings) | Marker symbol per signal type. Change one type at a time. |
| ATR Filters (14 Period) | Enable Seed ATR Filter | Turns the Seed ATR filter on or off. |
| ATR Filters (14 Period) | Seed ATR Multiplier | Seed volatility threshold. |
| ATR Filters (14 Period) | Enable Banana ATR Filter | Turns the Banana ATR filter on or off. |
| ATR Filters (14 Period) | Banana ATR Multiplier | Banana volatility threshold. |
| Pattern Recognition | Check Max 50% Pullback | Filters pullbacks that retrace too far. |
| Pattern Recognition | Check Min 25% Pullback | Filters pullbacks that are too shallow. |
| Pattern Recognition | Lookback Candles | Candle window used by selected pattern checks. |
| Trend Filters (EMA) | Fast EMA Period | Fast moving-average period. |
| Trend Filters (EMA) | Slow EMA Period | Slow moving-average period. |
| Trend Filters (EMA) | Slowest EMA Period (HTF) | Higher-timeframe trend reference. |
| Trend Filters (EMA) | Display EMA lines used by filters | Shows or hides the filter EMAs on chart. |
| Trend Filters (EMA) | Normalize trend strength using ATR | Scales trend strength by volatility. |
| Trend Filters (EMA) | ATR period used for trend normalization | ATR period for that normalisation. |
| Trend Filters (EMA) | Bars back for EMA slope calculation | Window used to measure EMA slope. |
| Trend Filters (EMA) | Minimum slow-EMA slope (ATR units) | Minimum slope required to call a trend. |
| Trend Filters (EMA) | Minimum EMA separation (ATR units) | Minimum gap between EMAs. |
| Trend Filters (EMA) | Bars required to confirm trend direction | Confirmation window for direction. |
| Additional Filters | Directional Confirmation - Banana | Extra directional check for Banana signals. |
| Additional Filters | Directional Confirmation - Seeds | Extra directional check for Seed signals. |
| Additional Filters | Check Breakout | Requires a breakout context. |
| Additional Filters | Breakout Lookback Period | Bars used by the breakout check. |
| Additional Filters | Confirm Breakout | Requires breakout confirmation. |
| Additional Filters | Pause new signal generation | Stops new markers while the indicator stays attached. |
| GUI Display | Show/Hide Main Dashboard | Shows or hides the MT4 dashboard. |
| Alerts | Show Pop Up Alert | Terminal popup on a new signal. |
| Alerts | Play Sound File at Alert | Plays a sound on a new signal. |
| Alerts | Sound File Name | Which sound file to play. |
| Alerts | Send Email Alert | Sends email via the terminal's email settings. |
| Alerts | Send Push Notification | Sends push via the terminal's notification settings. |
The MT4 dashboard also carries buttons for Fast EMA, Slow EMA, Slowest EMA, Crossover Check, Strict Mode, Trend Filter, and MA Lines. Marker and EMA colours live on the MetaTrader Colors tab and are visual only — they do not change signal calculation.
MetaTrader 5 inputs
Source: MT5 settings, captured from BananaIndicator 2.00.
| Group | Input | What it controls |
|---|---|---|
| Signal Appearance | Pullback threshold (pips) | Pullback threshold used by the signal logic. |
| Signal Appearance | Arrow distance from bar extreme (pips) | Moves markers away from the candle high or low. |
| Signal Appearance | Place arrow at bar midpoint | Alternative marker placement. |
| Signal Appearance | Signal Arrow Style | Marker style. |
| Signal Appearance | Custom Buy Arrow Code | Used only when the custom marker style is selected. |
| Signal Appearance | Custom Sell Arrow Code | Used only when the custom marker style is selected. |
| EMA Periods | Fast EMA period | Fast moving-average period. |
| EMA Periods | Slow EMA period | Slow moving-average period. |
| EMA Periods | Slowest EMA period | Trend reference period. |
| ATR Filter | Seed ATR multiplier (14-period) | Seed volatility threshold. |
| ATR Filter | Banana ATR multiplier (14-period) | Banana volatility threshold. |
| Trend Filter (Advanced) | Trend ATR period | ATR period used by the trend filter. |
| Trend Filter (Advanced) | Bars back for EMA slope calculation | Window used to measure EMA slope. |
| Trend Filter (Advanced) | Minimum slow-EMA slope | Minimum slope required to call a trend. |
| Trend Filter (Advanced) | Minimum EMA separation | Minimum gap between EMAs. |
| Trend Filter (Advanced) | Bars required to confirm trend direction | Confirmation window for direction. |
| Optional Pattern Filters | Require directional candle | Requires a directional signal candle. |
| Optional Pattern Filters | Require impulse leg | Requires a prior impulse leg. |
| Optional Pattern Filters | Require swing break | Requires a swing break in context. |
| Optional Pattern Filters | Breakout lookback | Bars used by the breakout check. |
| Optional Pattern Filters | Check Max 50% Pullback | Filters pullbacks that retrace too far. |
| Optional Pattern Filters | Check Min 25% Pullback | Filters pullbacks that are too shallow. |
| Optional Pattern Filters | Lookback | Candle window used by selected pattern checks. |
| Pattern Visibility | Show Banana 1 … Show Banana 7 | Which Banana signal types are visible. |
| Pattern Visibility | Show Seed 1 … Show Seed 3 | Which Seed signal types are visible. |
| EMA Lines | Display EMA lines | Shows or hides EMA lines on chart. |
| Signal Control | Pause new signal generation | Suppresses new markers while the indicator stays attached. |
| Alerts | Popup / push / email / sound / sound file | Notification methods; the terminal's own notification settings must also be configured. |
The MT5 build can publish filter state, signal state, license state, and dashboard-control state to the MT5 dashboard. Treat dashboard information as decision support, not as a command to trade.
TradingView inputs (v3, Pine v6)
Source: TradingView settings. Defaults below match the current v3 script. Plot colours and line widths live on TradingView's Style tab, not in Inputs.
| Group | Input | Default | What it controls |
|---|---|---|---|
| 1 · Signals | Signal logic | AIMS Banana Pattern | Banana Pattern = stricter multi-bar pullbacks. AIMS Algo Logic = Algo-style engine with fewer, different markers. |
| 1 · Signals | Buys / Sells | On / On | Turn off one side to review only long or short setups. |
| 1 · Signals | Show B#/S# labels | On | Numbered buy/sell labels on confirmed bar close. |
| 1 · Signals | Show arrows | Off | Diamond markers; off keeps glow and labels only. |
| 1 · Signals | Glow on signals | On | Highlight around signal bars. |
| 1 · Signals | Exit marks | On | x when a live setup hits TP1 or stop/invalidation. |
| 2 · Filters | EMA filter (master) | On | Master switch for all EMA-based filters. |
| 2 · Filters | Price vs Slowest MA | On | Buys only above the slowest EMA; sells only below. |
| 2 · Filters | Crossover: fast vs slow | On | Requires fast/slow EMA alignment for the direction. |
| 2 · Filters | Crossover: slow vs slowest | Off | Stricter trend alignment when enabled. |
| 2 · Filters | RSI filter | On | Blocks extremes. |
| 2 · Filters | SuperTrend | On | Direction filter. |
| 2 · Filters | Parabolic SAR | Off | Optional SAR filter. |
| 2a · SuperTrend | ATR Length / Factor | 10 / 3 | SuperTrend parameters. |
| 2b · RSI | Length / Overbought / Oversold | 14 / 70 / 30 | RSI filter parameters. |
| 2c · Parabolic SAR | Start / Increment / Max | 0.02 / 0.02 / 0.2 | SAR parameters. Show SAR on chart is off by default. |
| 3 · Moving Averages | Fast | 9 | EMA period (close[1] — non-repainting). |
| 3 · Moving Averages | Slow | 21 | Used by crossovers and ribbon. |
| 3 · Moving Averages | Slowest | 70 | Primary trend filter when Price vs Slowest MA is on. |
| 4 · Trading Session | Enable session window | Off | When off, session times are ignored. |
| 4 · Trading Session | Session 1 | On (06:00–20:00 London) | Active only when the master switch is on. |
| 4 · Trading Session | Session 2 | Off (14:30–15:30 London) | Optional second window. |
| 5 · Trade Levels | TP1 (× risk) | 2.0 | Reward multiple of the entry→stop distance. |
| 5 · Trade Levels | TP2 (× risk) | 5.0 | Second target multiple. |
| 5 · Trade Levels | TP in pips instead | Off | Fixed pip TPs when on (TP1 5, TP2 10 pips). |
| 5 · Trade Levels | SL in pips instead | Off | Fixed pip stop (10 pips) when on. |
| 5 · Trade Levels | Stop basis | Bar low/high | Or Smart Trail (SuperTrend line), falling back to the bar extreme if the trail is on the wrong side. |
| 5a · Entry / SL offsets | SL bar offset, entry / SL buffers | 0, 1.0 each | Advanced offsets, tick-aware inside the script. |
| 6 · Display | Show trade levels | On | Entry, stop, TP, invalidation on chart. |
| 6 · Display | Level style | Zones | Zones, Lines, or Both. |
| 6 · Display | Extend (bars) | 20 | How far level graphics extend right. |
| 6 · Display | Show only current setup | On | One live setup per direction; clears the opposite side. |
| 6 · Display | Hide untriggered + superseded | On | Replaces stale same-side levels when a newer signal forms. |
| 7 · Trend Colouring | Smart Trail (glow) | On | SuperTrend line with glow halo. |
| 7 · Trend Colouring | Gradient candles (by strength) | On | Candle fill by trend strength. |
| 7 · Trend Colouring | EMA ribbon | Off | Fill between fast and slow EMA. |
| 7 · Trend Colouring | Background shading | Off | Subtle trend background. |
| 7 · Trend Colouring | Colour basis: MA (else SuperTrend) | Off | Bar/background basis when shading is on. |
| 8 · Risk (reference) | Risk % | 1.0 | Used in PineConnector alert text only. The indicator does not size positions. |
| 9 · Dashboard | Show dashboard | On | Pine table panel on chart. |
| 9 · Dashboard | Position | Top Right | Also Top Left, Bottom Right, Bottom Left, Middle Right. |
| 9 · Dashboard | Theme | Dark | Dark or Light. |
| 9 · Dashboard | Text size | Normal | Tiny / Small / Normal / Large. |
| 10 · Alerts | Enable alerts | On | Fires script alert() on new buy/sell signals, once per bar. |
| 10 · Alerts | PineConnector messages | Off | Emits buystop/sellstop automation strings instead of plain text. |
| 10 · Alerts | PineConnector License ID | 000000 | Your PineConnector license when automation is on. |
| 10 · Alerts | PineConnector Symbol | GER40 | Broker symbol name for automation messages. |
| 10 · Alerts | Use stop orders (else market) | On | Stop vs market order type in the PineConnector payload. |
The TradingView dashboard shows symbol, trend, RSI, session state (when enabled), active LONG/SHORT setup levels, and filter flags — not P/L or win rate.
FAQ
What is the Banana Indicator and what does it do?
It is a visual chart indicator that marks pullback-style Banana and Seed signals on your chart — moments where price has moved, paused, and may be ready to continue. A marker is a prompt to review, not a trade instruction: it never places trades and does not replace your plan. It runs on MT4, MT5, and TradingView.
What's the difference between a Banana signal and a Seed signal?
Banana signals are the main markers most traders review first — a pullback inside an established trend. Seed signals fire earlier, while a setup is still developing, so they help you watch a move form but can also crowd the chart. If you are new, focus on Banana signals and hide Seeds until you know why you want the earlier read.
What do the Banana numbers 1 to 7 mean?
They are signal types, not a ranking. Each number is a different pullback-pattern length — how many bars price has pulled back. A higher number is not automatically a better trade and a lower one is not weaker: read the number as the pattern type, then validate the chart context yourself.
How do I read the buy and sell markers — can I trade them straight away?
Buy markers sit below or near the candle and sell markers above; the exact shape and colour depend on platform and settings. Do not act on a marker on a still-forming candle — wait for the candle to close. A signal is information to review, not a green light.
Why am I seeing no Banana Indicator signals?
Long quiet stretches are normal — the indicator only marks a pattern when its conditions are met. Check that the market is open and the chart is receiving price, that "Pause new signal generation" is off, that signal visibility is not turned off, that you have not hidden all Banana and Seed types, and that the license is accepted. Confirm it is attached and receiving data before changing settings.
My chart has too many markers — how do I clean it up?
Declutter in this order: hide Seed signals first, show fewer Banana counts, turn off EMA lines if they distract, and keep to one chart while you learn. Which types show is controlled by the signal-visibility settings on your platform.
My license key or SerialKey is rejected (ERROR 100)
"[ERROR 100] License Key Required" means the indicator is attached but no valid key was found. Open the indicator Inputs tab — right-click the chart, then Indicators List, then the Banana Indicator, then Edit or Properties — enter your key in SerialKey exactly as issued with no stray spaces, confirm you have internet access, then remove and reattach the indicator. TradingView is different: access there is invite-only, not a SerialKey.
The alerts aren't firing
On MetaTrader, confirm the indicator alert setting is on, then test the platform itself — email under Tools > Options > Email, push under Tools > Options > Notifications — and check that sound is not muted. If the platform test fails, fix that first. On TradingView, make sure you actually created an active alert and that your plan allows it.
I can't get access to the Banana Indicator on TradingView
The TradingView script is invite-only. Check that you are signed in to the correct TradingView username, that you requested and were approved for access on that same username, and refresh the script page after approval.
Which guide do I use — MT4, MT5, or TradingView?
Pick the platform you actually chart on. The setup, interface, alerts, and troubleshooting differ across them, and the three builds are separate products rather than one indicator with different screenshots.
More questions: full FAQ · troubleshooting · contact support.
Platforms and how to get it
| Platform | Product name | Access method | What you see on chart | Docs |
|---|---|---|---|---|
| MetaTrader 4 | The Banana Indicator MT4 | Installer + license key (SerialKey) | Banana 1–7 markers, compact v44 dashboard, on-chart strategy rules | Start on MT4 |
| MetaTrader 5 | The Banana Indicator MT5 | Installer + license key (SerialKey) | Suite iTradeAIMS Dashboard, VALID / INVALID filter readout, Banana tab | Start on MT5 |
| TradingView | The Banana Indicator TV (v3) | Invite-only script access on your TradingView username | B# / S# labels, trade zones, Pine dashboard row | Start on TradingView |
Not sure which fits? Compare platforms · Get started.
Get The Banana Indicator
- Already a member — your download, license key, and course access are in the iTradeAIMS Members Portal. TradingView users request script access there too, then follow Get TradingView access.
- Not a member yet — the product and pricing page is The Banana Indicator on itradeaims.net.
- TradingView script pages — see the list below; access is granted per TradingView username.
Current Pine build (v3) — B#/S# labels, zones, dashboard.
Previous edition — keep only if your charts still use the Legacy script.
Start here
- Get started — choose MT4, MT5, or TradingView.
- Banana strategy rules — methodology, range vs trend, workflow.
- The 7 rules — full rule detail from the course.
- Signal detection — what Banana and Seed markers mean.
- Validate a signal — before you act.
- Compare platforms if you are unsure which version fits.
- Troubleshooting — install, access, alerts, display.
Platform docs
- MT4 docs —
The Banana Indicator MT4 - MT5 docs —
The Banana Indicator MT5 - TradingView docs —
The Banana Indicator TV
Risk notice
The Banana Indicator is not financial advice. A signal is not a recommendation to buy or sell. Trading involves risk; you are responsible for your own decisions and risk management.
Official links
- iTradeAIMS website: https://itradeaims.net
- iTradeAIMS Members Portal: https://my.itradeaims.net
- TradingView profile: https://www.tradingview.com/u/iTradeAIMS/